header/navigation

LLLHeader2
Lavnav2_v4

Thursday, February 21, 2013

Bento Living!

Here's why I wanted a Laptop Lunch Box:

  1. It's fun to say.
  2. I'm big on bringing my lunch and snacks from home, and was tired of wrangling a bunch of tupperware containers.
  3. It helps me eat a variety of food for lunch.
  4. It prevents me from doing things like leaving my whole container of hummus in the fridge at work over the weekend. 
  5. I can only eat what I bring with me. 
  6. It's like Lunchables for grown ups.
  7. Packing it at night take awhile but it saves time in the morning.
  8. I can photo document my life in lunch for when I need healthy lunch inspiration!
I've gone as far as to make a set on Flickr. Plus the Laptop Lunch website has lots of great inspiration galleries.

Pizza plus some healthy stuff

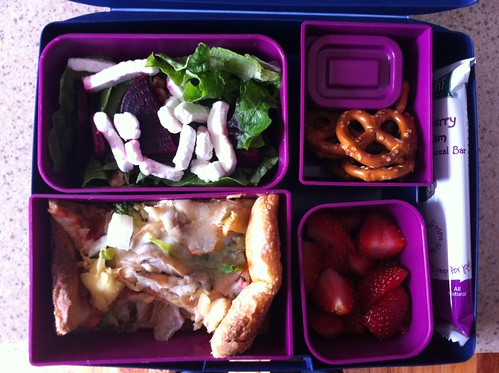
Clockwise: Salad with beets and goat cheese, pretzels with hummus, Kashi soft bake cereal bar, strawberries, veggie pizza!

Untitled

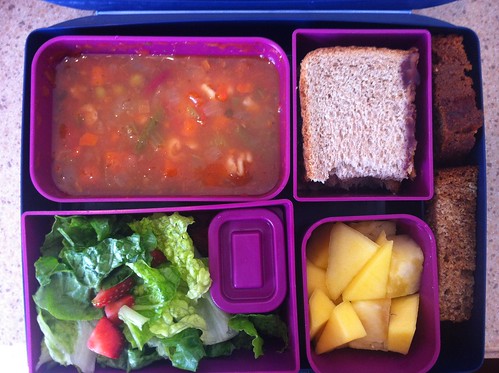
Clockwise: Amy's minestrone soup, half a peanut butter & jelly sandwich, half a piece of banana bread, mango and pineapple, salad with strawberries & pecans with dressing on the side.

Untitled

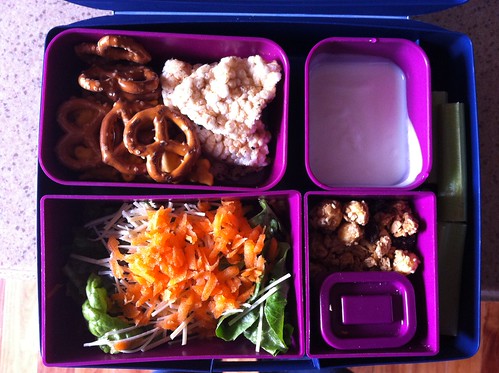
Clockwise: Crunchy things: Cheddar bunnies, pretzels, tamari & seaweed rice cake, yogurt for mixing with granola, celery on the side, salad with dressing on the side.

Wednesday, February 13, 2013

My Garden: Full Circle

I've been planning my garden for this summer, and I'm getting really excited! I've been reading a bunch about companion planting, and I opened a trial account at GrowVeg.com so I can lay out my beds.

Last year I just put plants I bought at the nursery in the ground and hoped that they grew. I ended up with way too much of some things (grape tomatoes), and some plants I never had a long enough growing season for anyway, so they didn't thrive (carrots, brussels sprouts).

Here's the garden last year through the seasons.

Spring

Everything just planted!

Raised bed garden

Summer

That's lettuce that has bolted and gone to seed on the right, and cabbages ravaged by cabbage worms... bastards. Also some wild grape tomatoes on the left (I didn't learn about pinching of suckers until late in the year), cucumbers got crazy, and pepper plants that produced well into the season!

IMG_8165

Fall

Pretty much just cleaned everything out. There was some swiss chard still, and beets and carrots that didn't produce because I didn't plant them soon enough. But in the back of the bed on the left is garlic!


Untitled

Winter

Well, you know, it's winter. I'm just glad no trees came down on the garden during Sandy.  It will get plenty of sun this year at least.

Untitled

Sunday, February 10, 2013

New in the Shop!

New made to order items for your consideration in my Etsy shop, Loops of Lavender!

Love knot scarf.

Can be made with ends loose or joined for an infinity love knot scarf, aw! Shown worn tripled here for cowl look.

IMG_2316

Pom pom slippers.

Mary jane style slippers with a cute pom pom embellishment.

IMG_2332

Yummy puff stitch scarf in new colors.

IMG_2267

Wednesday, February 6, 2013

Project Linus: Knit & Crochet Blankets to Donate

My knit and crochet group has just chosen our latest charity project and I'm really excited about it.

For the months of February and March will be stitching blankets to donate to Project Linus.

Project Linus is a non-profit organization that provides homemade blankets to children in need.


Where I live in New Jersey, they have a Warren/Morris county chapter that would love to accept our donations!

We will be making 12” x 12” squares that I have volunteered to stitch together into finished blankets.

Sunday morning Camo wheel stitch

We would love for everyone to participate in this!

Even if you are not from the area, but want to help! 

Please feel free to create full blankets or squares on your own, I’ll find a way to get all finished projects/squares together, just email me at loopsoflavender@gmail.com to coordinate if you have questions!

Here are some guidelines:
  1. Project will run from today to the end of March 2013, at which time blankets will be assembled and donated.
  2. Yarn should be clean, washable, and not be exposed to smoke or other strong smells/contaminates.
  3. No wool please.
  4. Size specifications:

    Squares - 12” x 12”

    Finished blankets - Project Linus donates blankets to children, infants through teens. Blankets could be as small as 36” × 36.” The majority of Project Linus blankets are about 40” × 60”, or what is called “crib size.” Blankets could be as large as twin size for teens.
  5. Blankets can be knit or crocheted, use any pattern you like. Project Linus has a pattern resource page here. 
I’m going the granny square route on this one, they go fast for me. I’m also going to create some wheel stitch squares, it’s my favorite stitch… next to love kont. :op

I’ve dedicated myself to making at least 2 squares a week, and I hope I can likely make more if I start crocheting on my lunch breaks!

Can’t wait until squares start rolling in! If you have plans to participate please comment and let everyone know! Please share and help spread the word! I think this is a great cause and a fun project for the group to give back locally.

If you're on Ravelry, you can follow the project's progress here!

Any questions contact Kim at loopsoflavender@gmail.com.

Finishing projects Stash bust for charity fun! Yikes!

Sunday, February 3, 2013

Crocheted Clothes Hangers

Stash bust plus repurpose crappy wire hangers from the dry cleaners by crocheting over them. They look cute and will keep your clothes from slipping to the floor.

photo 4

Skill level
Beginner

Supplies
Wire hangers
Worsted weight yarn in your choice of colors
6.5 mm crochet hook
Hot glue gun

Skills
Single crochet

photo 1
  1. Attach the yarn to the hanger to one side of the hook by reaching under the hanger and drawing up a loop. Yarn over with both the loose and working and end and draw through.

    Untitled
  2. Continue single crocheting around the hanger, putting your crochet hook under the hanger like it was the loops of your crochet work. 
  3. Crochet up and around the hook, and fasten off.
  4. Use a bit of hot glue to secure the yarn from sliding off the end of the hook.
  5. Cut about eight inches of yarn, and tie a bow around the base of the hook.
photo 2